dark chocolate cupcakes w/ peppermint swiss meringue buttercream*

A bunch of firsts for my hubby this week. I made him watch The Grinch with Jim Carrey, and The Santa Clause with Tim Allen. He hadn't seen either one and I gotta admit, I was nervous. He likes to pretend like he is too macho to enjoy a "family friendly" movie, and guess what. He thoroughly enjoyed both! SCORE! (Keep it hush hush. Wouldn't want to crush his ego.)

Christmas is 3 days away and I have the PERFECT cupcake for you! We served these babies this past week at a sports banquet for the students and they were a huge hit! If nothing else, you need to make the dark chocolate cake. It was chocolatey - but not too chocolatey, moist and delicious. Oh and the buttercream. Man oh man, I have never had swiss meringue buttercream, and it is officially one of my new favorite things - and I am not a huge buttercream fan! And I am always down for peppermint anything. Simply an AH-MA-ZING dessert I tell you.


Dark Chocolate Cupcakes w/ Peppermint Swiss Meringue Buttercream

Dark Chocolate Cupcakes

baked maple bars*

MERRY CHRISTMAS!!! Yes, I am still alive! I cannot believe I have not posted since JULY. That is crazy, but most of all not OK. I promise you, I have still been creating and cooking and baking away. It's gotten so bad that I don't even take pictures of my creations anymore. However, 2013 is approaching and I am going to turn a new leaf. Or lack thereof these days in my neck of the woods. I miss the pretty leaves. And the sun. And flip flops. Mostly flip flops. I wore them today for fun because I have missed them so much. Thought my toes got frost bite, but did it anyway.

Christmas is a little over a week away and I am so stinkin excited!! This year for my birthday I asked for a Christmas tree and new decorations that match the house. I know, I'm weird. I have been told this over and over again these past few months. My tree was up on November 4th. Don't judge me. One month is not enough time to have the twinkling lights and happiness that come from looking at your cute tree. I also made my own ruffled tree skirt (tutorial here - found it on Pinterest of course). Wanna see a picture??


You can't see my cute skirt in this pic, so here is another with my cute little nephew. He decided that he would play with the ornaments. Good thing he's cute :). If you look closely you can see the skirt in the background.


Sorry, I did take a normal pic of it, but then I got a new phone and was too lazy to take all my pictures off of my iPhone. I am happy to announce that I am now an android owner/user again!!! Beats the iPhone any day.

Anyway, let's get down to business. These maple bars are seriously amazing. My favorite part is that they are baked! They are healthier, but most of all I don't have to deal with the mess of using oil. I am a clean freak (in case you didn't know) and whenever I cook with oil I scrub and degrease and scrub some more and the dang stuff just gets on everything. These are no fuss with these bars, and honestly if I can make them successfully so can you! Especially since I really stink at making bread. Don't know if I could repeat this amazing feat again, but I will try because these are one of my new favorite things!! I even bought some shortening for the event, which is a big deal for me. The stuff freaks me out. Like a lot. I kind of have the heeby jeebies just knowing it is in the pantry right now. Ick.

*By the way, I realize that the format is all messed up and there aren't spaces where spaces should be, but blogger is being dumb right now and won't save normally. Technology these days.....*


Baked Maple Bars
from Make Lemonade and More

Maple Bars
1 1/2 cups milk
1/3 cup shortening
4 Tablespoons granulated sugar
2 teaspoons salt
1/4 cup lukewarm water
2  (1/4 ounce) envelopes yeast - which equals 4 1/2 tsp. if you have it in the jar like me
2 large eggs, beaten
5 cups flour (might need a bit more, but I used about 4 3/4 cups)
2 teaspoons cinnamon (a little extra never hurt anybody!)

Maple Icing
1/3 cup butter
1 cup packed brown sugar
\1/4 cup milk
1 1/2 cups powdered sugar
2 teaspoons mapleine (found by the flavor extracts and seasonings)
1/8 teaspoon salt*
For the dough:
In a medium saucepan scald milk; add shortening, 3 Tablespoons granulated sugar, and salt. Stir to combine and set aside to cool to lukewarm.

In a large mixer bowl, add the lukewarm water and the yeast (remember the water should be just lukewarm, too hot and it will kill the yeast) Add the remaining 1 Tablespoon of sugar to the yeast and water and whisk to combine. Let sit for about 5 minutes until it starts to bubble and become foamy. After the yeast is foamy and the milk mixture is luke warm. Add the eggs to the yeast and stir to combine, then add the milk mixture to the yeast mixture. Whisk the cinnamon into the flour and gradually add to the yeast mixture. You may need to add more, you want the dough slightly sticky but not too sticky.  Knead for 3 to 5 minutes. Spray another large bowl with non-stick spray, place dough in the bowl and let raise for an hour or until double in size.

Punch down and roll out into a large rectangle about 1 inch thick. Cut into rectangles, I cut the rectangle in half, and then each half into 6 pieces to make 12 bars, then place on a greased baking sheet. Let raise for about 30 minutes. While bars are raising,  preheat the oven to 425 degrees. Bake the bars for 7 to 8 minutes or until light golden brown, Watch carefully. Remove from oven and let cool slightly before icing.
Make the icing while the bars are raising:
In a small saucepan mix butter, brown sugar and milk. Bring to boil for medium heat and simmer 3 minutes.l Remove from heat and cool for 15 minutes. Add the mapleine and powdered sugar and blend well with a hand mixer. Add a little more powdered sugar if needed (I added about 1/4 cup more). Spread on your cooled bars and eat your little heart out! Extra delicious with an ice cold glass of milk!
*I just realized that the recipe calls for 1/8 tsp. of salt, which I am assuming goes in the frosting, and I didn't put it in because it wasn't in the instructions. So if you leave it out, I promise it will still taste amazing! You won't even miss it!

So yeah. Make these. They are yummy. I promise I will be back before another 5 months pass by. Maybe even this week if I get crazy!!

-alyssa*

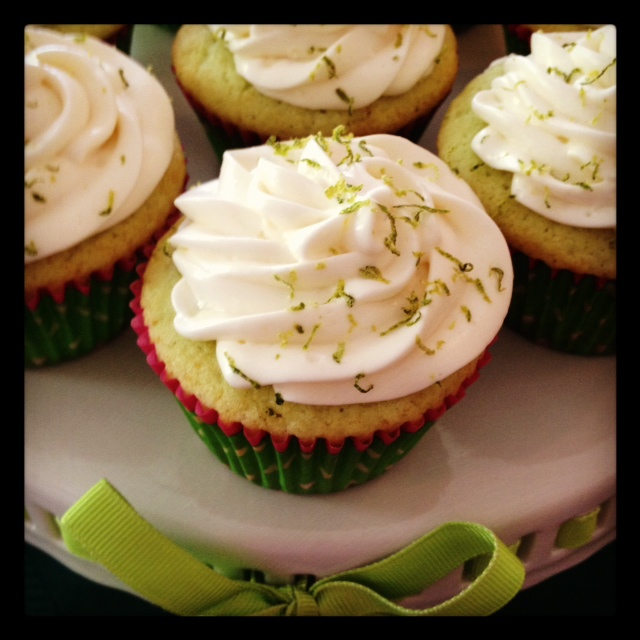
key lime cupcakes*

Sprinkles. I don't understand the dang things. They are just a crunchy, hard, tasteless, useless ornament that I just simply don't get. Which brings me to funfetti cake. I don't understand funfetti cake, either. I know, I know, you are thinking - OH MY GOSH I LOVE FUNFETTI CAKE! That's fine. Love it all you like. I am sure that Pillsbury appreciates you. Me on the other hand, not a fan.

Which brings me to these cupcakes. I am a HUGE fan of these cupcakes! They are the bees knees! The original recipe doesn't add any lime juice in the frosting, but I can't imagine it without it! I don't think the lime flavor would be nearly as prominent in just the cake alone. I also have a secret, I used regular limes! I wasn't about to zest and juice a million key limes. I've got things to do people! You must, I say MUST, make these for your next BBQ, family function, church activity, or heck - just make them for yourself and eat the whole batch!! I won't tell, I promise :).


Key Lime Cupcakes
adapted from My Madison Bistro, whom adapted from Bon Appetit, Sept. 2008

orange creamsicle cookies*

Fantastic news friends! I have successfully moved for the last time in a long LONG while! I have actually lived in my new house now for 2 months yesterday, and we are loving every minute of it! I have had quite a grand old time shopping and shopping, and did I mention shopping?? Well, I shopped my little heart out for decorations. I have officially been banned from shopping with my mother-in-law. For real. Except for when I sneak down to meet her at the store on Saturday mornings while Landon is mowing the lawn at our rental. OOPS! Wanna see some pics of my cute house??


Notice the decorations?? Yeah, we didn't have nearly that many 2 months ago. So on your top left we have my cute office. That desk actually originally belonged to Jerry Spanos, the Founder of Heritage School (a.k.a. the greatest place to work EVER). I stumbled upon it on KSL, only to discover it was owned by one of the therapists that had refinished it and it is just the cutest thing!

On the top right is my kitchen, where I spend most of my time. I absolutely love the undermount sink for easy cleanup, the cute granite countertops, but most of all - the huge walk-in pantry! I don't have a picture of that on my little collage, but I literally could fit a twin size bed in there and sleep next to my baking cups and chocolate chips like its no ones business.

The bottom left is my living room where we lounge away and watch the Kardashians (don't judge) and House Hunters (yes, I'm still obsessed with HGTV even though I have now bought my forever home). See those cute green lamps? I recovered those shades my very own self! YES - go me!!

And finally, on the bottom right is our extra bedroom. Believe me, it's a bazillion times cuter than our master. We have yet to buy any cute furniture and decorations for our master, because I'm always too busy decorating everything else. One day, one day...

The rest of the house includes a full bath next to the extra bedroom, a half bath next to the kitchen, laundry room (a.k.a. Tankers' sanctuary), our room and master bath, and an unfinished basement with room for 2 more bedrooms and a family room. I love love LOVE it! In just 2 weeks we are putting up a fence for our puppy to run his little heart out, and then our next project is sprinklers and grass in the backyard - our front yard is landscaped, thank goodness.

ANYWHO - if you are still reading thus far, I am sure you are wanting to get to the good stuff! These cookies were made for parent conference back in May, and I had request after request for the recipe. And what did I say? Don't you fret, I'll put it on the blog! Ummm...better late than never???


Orange Creamsicle Cookies
adapted from Baked Perfection

chocolate chocolate chip cookie dough cupcakes*

It's about time that I shared this recipe with you guys! I have a rule. I never make the same dessert twice for the students. Although I have not broken this rule, I have made these for parent conference, a family dinner, a girls night out, and for a couple of my new neighbors! I think it's safe to say that I am obsessed with this recipe!

The only change that I made from the original recipe was that I thought cookie dough in the middle as well as a cookie dough frosting may be a little overkill, so I didn't freeze my cookie dough balls. I formed them and put them straight into the batter. A couple of times I put them in the fridge for a few minutes just so they weren't so sticky. I LOVE the cooked cookie in the middle with the yummy frosting! I'm looking forward to making these yet again hopefully in my near future!


Chocolate Chocolate Cookie Dough Cupcakes
from Java Cupcake

tuscan pasta with tomato-basil cream*

Today has been the best weather of the year, and I am tellin you my spirits are high! This has been the best winter/spring that I have ever experienced and probably will ever experience. I have already told the husband that we are being more exciting people this upcoming summer, because last summer was a total bummer. We are going to go to some batting cages, to St. George for some fun laying out sessions and maybe even some pool swimming, and we are going to go camping for 1 night. Camping for 1 night has been a goal of mine for 5 years now, so maybe 5 is my lucky number. Landon has still yet to go camping in his whole entire life.

*Notice I am saying ONE night. I don't really like camping-like at all. I just want to eat a legit s'more :).

We have already kicked off our quest for a fun summer today (I know, it's still spring, but it's like 80 outside!). My best friend is moving to San Diego, and so we attended her going away party up the canyon and had a BBQ. Although I'm totally bummed that she is leaving me for the beautiful state of California, I am so happy that we could have a fun get-together with some yummy food, great weather, and the best company! Which reminds me, summer parties are coming up, so bring this broccoli salad in tow. I did!

This pasta is on my not-so-new-anymore menus, and it is so delish! It is in the running for being a parent conference meal, so it must be a big deal :). I am obsessed with pasta sauces that are half Alfredo/half marinara, and this sauce reminds me of that only I like it so much more. As you probably are aware, I am infatuated with fresh basil, and this sauce has plenty of that as well as lots of other yummy and fabulous ingredients.

I am going to post the recipe as it was written on the website, however I did make some minor adjustments. Basically instead of buying sun-dried tomato Alfredo sauce, we made our own homemade Alfredo sauce and pureed in some sun-dried tomatoes. If you decide to do the same, make sure that you buy the sun-dried tomatoes that are in a jar in oil, not the dehydrated-looking kind. I would suggest making this adjustment because homemade is always better than store bought, and really doesn't take that much more time. But I won't hold it against you if you take the easy way out :). Oh, and we didn't use any white wine. So basically I did everything different but add fresh tomatoes, some basil and some Parmesan cheese. Hmmm...I think I am going to stop typing now..


Tuscan Pasta with Tomato-Basil Cream
from MyRecipes.com

raspberry filled vanilla cupcakes w/ vanilla buttercream frosting*

Last night I finally broke down and downloaded the Draw Something app on my phone and made the hubby play with me. Oh, my cute little husband. He is so funny and doesn't even try. If you have never played before, it is just like Pictionary. It lets you watch your opponent draw their picture and make mistakes and erase and start over until they finally have their finished product. Well, I was watching the hubs draw his word with my thinking cap on, just trying to get it in record time. He kept erasing over and over, and each thing he tried to draw was completely different, just leaving me more and more confused. And then I thought for sure I got it. He was drawing a dinosaur with a spiky mohawk! Then he erased and drew an American flag with "42 cents" written in the corner. Evidently his word was "stamp". So I asked him where the dinosaur came into play. What I thought was a dinosaur, was actually the Statue of Liberty. Oh man...hahaha. I was laughing so hard I was crying. Definitely my new favorite game! If nothing else, it cracks me up!

These cupcakes were the dessert at the sports banquet on Wednesday. The blog I got the recipe from suggested ways to make your store bought cake mix taste homemade, so I followed those instructions. Although, I think each store bought cake mix is different because all of the extra ingredients just made my cupcakes fall apart easily. You live, you learn. Homemade is the way to go!

I think I also kind of got anxious with my filling, because I don't think I let it boil long enough and get as thick as it needed to be. Once it cooled down and I added my raspberries, it wasn't as thick and I wanted it to be. So I added some whipped topping to make it thicker. So if you find yourself in the same predicament, I would suggest adding about 1/2 cup to 1 cup of whipped topping to your filling. It still tastes amazing!


Raspberry Filled Vanilla Cupcakes w/ Vanilla Buttercream Frosting
adapted from Tidy Mom