dreamy oreo brownies*

With all of this warm weather, I really have neglected my blog! Landon and I have been so busy doing yardwork, painting fences, watching my cute lilies grow, and just enjoying outside. We are also in the process of buying a second house. With the current economy, houses around these parts are pretty affordable and we decided it is our time to become investors! We haven't found one that we want yet, but hopefully soon! However, I may be next to distinct as far as blogging when we actually get a house. We are planning on buying a fixer-upper, and we are the fixers :). But we are super excited and hope that we find one SOON!

We made these brownies today for all of the students. No kidding, once the creamy layer was made I could NOT stop eating it! AMAZING! I wish they used this creamy filling in actual Oreo's! If you do not like Oreo's - first off you are crazy (although I must admit, I don't like the centers - like at all..), and second of all - you will absolutely not like these! These brownies are definitely not lacking in the Oreo department. The Oreo brownie layer, followed by the Oreo cream layer, followed by a chocolate layer and then topped with more crushed Oreo's is absolutely and completely INCREDIBLE! Seriously, a party in your mouth! Make these - like right now!


Dreamy Oreo Brownies
from Cookies and Cups

1 box brownie mix - with ingredients to prepare them according to the package directions
1 (16.6 oz) package Oreo cookies divided equally into 3rds all coarsely chopped
1 (8 oz) tub of Cool Whip thawed in fridge
1 8 oz block of cream cheese softened
2 cups powdered sugar
1 1/2 cups semi-sweet chocolate chips
1 Tbsp vegetable oil

Prepare brownie batter according to package directions, folding in 1/3 of the chopped Oreos.
 
 
Bake according to package directions, until a toothpick inserted 1 inch from the edge comes out clean.
Let brownies cool completely.

Meanwhile in your mixer bowl beat the cream cheese and powdered sugar until combined and smooth.
With a spatula fold in the Cool Whip and another 1/3 of the coarsely chopped Oreos.
Spread the cream cheese mixture on top of cooled brownies.


Now in a microwave safe bowl melt the chocolate chips and the vegetable oil on medium power for 1 minute.
Stir and repeat in 30 second increments until melted. When chocolate is melted spread evenly over the cream cheese layer.

Now sprinkle the remaining Oreos on top of melted chocolate.
 
 
Refrigerate for at least 30 minutes or until ready to serve. Cut into squares.
 
 
I am telling you, the cream center is what makes this brownie. Seriously, it is out of this world! You are definitely going to need a glass of cold milk with this decadent and rich dessert! I'm not even the biggest fan of milk and was craving it in a serious way! This brownie is worth every last calorie. Mmmmmmm....
-alyssa*

anniversary, babies & chocolate pretzel caramel cream cupcakes*

Today is my 4 year anniversary of the day that I married my best friend, Landon Cundy. I don't know how I got so lucky! He truly is the most amazing man I have ever met, and I am so happy to call him my husband! Let me fill you in on a couple reasons why I love this man.

*He is such a hard worker. He takes so much pride in every little thing that he does. If something is going to have his name on it or if he is associated with it, it will be perfect. We both have the same amount of drive and ambition when it comes to everything we do, especially our jobs. I love that he takes everything he does to the next level and really strives to be the best at everything he does.

*I don't remember the last time I vacuumed because he vacuums nearly each and every week. I don't know if it is because he likes to vacuum, or because he is in love with our Dyson. Either way, I'm not complaining! He is also a very clean person. He is actually more of a clean freak than I am, and I love it!

*He LOVES yardwork. A couple of years back we bought his grandma's house that his mom grew up in. His grandma was known for having a perfect yard. Well, she demanded a perfect yard was more like it :). None the less, Landon has more than happily carried on that tradition. Our yard is my very favorite part of our house, and it is all thanks to my hubby.

*He is perfectly content to just chill. He doesn't have to be doing something at all times of the day. When I am not working and have had a very busy week, the only thing I want to do is sit down, snuggle with my husband and puppy, and watch a good movie. Landon is exactly the same. I could never be married to someone that has to be doing something at all times. I need my down time to function, and Landon is cool with that.

*Landon loves to hang out with just me and him. Some couples always have to be doing something with other people, otherwise they don't have much fun. Landon and I couldn't be more opposite of that kind of couple. He loves to hang out with just me and I LOVE to hang out with just him. We truly are best friends in every sense of the word. We don't need a bunch of other people around to be happy. However, we do need our puppy, Tankers. I don't know what we would do without him :).

*Last, but not least (because I need to wrap this thing up), he loves me. He doesn't pick fights with me over something stupid and always makes me feel like I am important. He puts up with my occasional "girl moments" and dramatics, and is a very good listener. He must truly love me, to put up with me for the last four years! I LOVE YOU LANDON!


Next item on the agenda: BABY! My little sister, Shea, gave birth to a beautiful baby boy on Tuesday, June 21st. Xander Joseph Swan was born at 8:24 p.m. - ish :), and he was 6 lbs. 14 oz. and 20 inches long. He is SO CUTE and little and has a ton of blonde hair! We still can't tell who he looks like more, mommy or daddy, but we did confirm that he definitely has Shea's ears! :)


How cute is he?? Aunt Alyssa loves you!!!

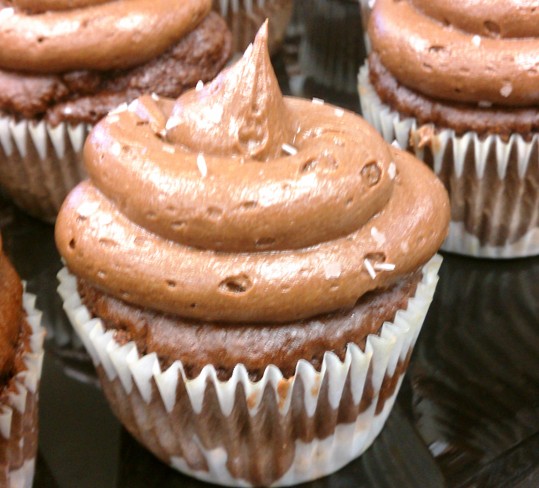
Now, let's get down to business. Just thinking of making these cupcakes and dreaming of what they would taste like literally made me drool! The blog I found them on actually made a chocolate peanut butter pretzel cupcake. I thought that a caramel cream in the middle sounded so amazing, so I decided to forgo the peanut butter cup middle. Although I am absolutely positive that having that peanut butter cup middle would be to die for as well!

I truly loved this cupcake. I was worried that after adding the brown sugar and butter to the pretzels that they wouldn't be all that salty anymore. They were still plenty salty! One of my staff actually didn't like them very much because she thought they were too salty. I thought they were perfect. I also sprinkled some kosher salt on top, too, so maybe that was what did her in. My only complaint is that I wish the pretzels would have remained a little more crunchy. They were softened just a little bit from the butter and brown sugar, and also from the cupcake batter on top. But they were SO yummy and really reminded me of a chocolate and caramel covered pretzel! Which was exactly what I was going for :).


Chocolate Pretzel Caramel Cream Cupcakes
adapted from Did Someone Say Party?

(makes 3 dozen cupcakes)

Ingredients:

Pretzel Crust 
1/2 cup butter or margarine, softened 
2 tablespoons brown sugar 
1-2/3 cups crushed pretzels 

Cake Batter 
1 box devil’s food cake mix 
1 small box Jello instant chocolate fudge pudding mix 
8 oz sour cream 
1 c applesauce 
4 eggs 
1/2 c milk 
1 tsp vanilla extract 

Caramel Cream Filling
5 tablespoons flour
1 cup milk
1 teaspoon vanilla
1 cup butter
1 cup granulated sugar (not Powdered Sugar!)

1/2 cup caramel topping

Frosting 
(if you want your frosting piled high like mine were, double this recipe)
1 cup butter (no substitutes), softened 
4 1/2 cups confectioners' sugar 
1 1/4 cups baking cocoa 
1/2 teaspoon vanilla extract 
1/2 cup milk 

Directions:
Preheat oven to 350 degrees F (175 degrees C). Crush the pretzels.  I used a food processor, but putting the pretzels in a ziploc bag and crushing them that way works, too. You want to get them pretty fine so you can get an even layer.

In a medium bowl, mix together the crust ingredients. Drop a small scoop of the crust mixture into the bottom of each cup (either a sprayed muffin pan or silicone cups).  Use a small glass to pack them down to a firm crust. Bake for 8-10 minutes.  Set aside to cool.


While those are baking, combine all the batter ingredients.  Mix well until the batter is well combined. Drop a small spoonful of batter onto each pretzel crust.  Bake at 350 degrees for 20-22 minutes until a toothpick inserted in the center comes out clean. While cupcakes are cooling, make the caramel cream filling!

To make the filling, in a small saucepan, whisk flour into milk and heat, stirring constantly, until it thickens. You want it to be very thick, thicker than cake mix, more like a brownie mix is. Remove from heat and let it cool to room temperature. It must be completely cool before you use it in the next step. Stir in vanilla.

While the mixture is cooling, cream the butter and sugar together until light and fluffy. You don’t want any sugar graininess left. Then add the completely cooled milk/flour/vanilla mixture as well as the caramel topping and beat it for about 10 minutes. That may seem like a long time, but believe me it makes it so light and fluffy and SO AMAZING. If it looks separated, you haven’t beaten it enough! Beat it until it all combines and resembles whipped cream.  If it seems really runny, then add a little bit of powdered sugar. I needed to add just a little, and then it was PERFECT!


Hull the cupcakes the make a perfect little nest for the caramel cream. 


I used a big star tip to fill the cupcake holes. Make sure they are filled all the way to the top, because you are not going to want to skimp on this stuff! 


Finally, make the frosting!  Cream 1 cup of softened butter with a mixer.  Gradually beat in confectioners' sugar, cocoa and vanilla. Add milk until frosting reaches spreading consistency.

Time to frost! I used a pastry bag with no tip and did a swirl. After frosting, sprinkle some sea salt on the top for a finishing touch!


And finally, DIG IN!


Salty yet sweet amazingness!


-alyssa*

s'mores cookies and a BIG cookie*

I love s'mores! I have not had a real s'more in which the marshmallow has been roasted over a camp fire for probably right around 10 years. The thought of this makes me want to cry. I have begged Landon for 4 years straight to go camping with me just so that I can make a s'more. He has never been camping in his life. That in and of itself completely boggles my mind. But we ARE going this year. Even if it's just for one night. I told him we can leave after work and come home first thing in the morning. I'm not picky. As long as I get my s'more, I'm a happy camper - literally :).

These s'mores cookies are AMAZING! They are so so easy and so ridiculously delicious. The cookie batter calls for cinnamon, and I am telling you right now I will never make another chocolate chip cookie dough without it. It is absolutely to die for! This is no exaggeration. I don't know why I never thought of it before, but I am so happy that this recipe called for it because it has forever changed my life!


S'mores Cookies
from Ice Cream Before Dinner
as seen on The Girl Who Ate Everything

11 Tablespoons unsalted butter, softened
1 cup brown sugar, packed
½ cup granulated sugar
2 large eggs
1 teaspoon vanilla
1 teaspoon baking soda
½ teaspoon sea salt
1 teaspoon cinnamon
2 ½ cups flour
1/2 cup semi-sweet chocolate chips
1 cup mini marshmallows
3 regular sized Hershey’s bars, broken into pieces
1-2 packages graham crackers, broken into squares

Directions:
Preheat the oven to 375 degrees. Line baking pans with parchment paper. I used one 11x17 pan and one 9x13 pan but you can really use any sized pans you want.

Lay out graham crackers side by side on the pans as close as possible (they should be touching). I used 16 graham cracker squares on one pan and 10 squares on another. You may have to add or remove graham crackers according to how much dough you have. If you want your cookies thicker you will use more dough and less graham crackers.

In a medium bowl, whisk together the flour, baking soda, sea salt and cinnamon to combine. Set aside.

In the bowl of an electric mixer, cream butter with white and brown sugar until light and fluffy. Add the eggs and vanilla and mix until combined.

Add the flour mixture to the butter mixer and combine on low speed.

Fold in the chocolate chips and marshmallows. Chill dough in refrigerator for 1 hour to overnight.


Place tablespoons of dough on graham crackers about 1 – 1 ½ inches apart. I averaged about 1 1/2 tablespoons of dough per graham cracker square as seen in the picture above. Press down slightly with fingertips.


Bake for 5 minutes then remove from oven to press Hershey’s bar pieces on to the top. You can place as many pieces or as little as you want depending how much chocolate flavor you want.


Bake for 5 – 7 more minutes or until dough is beginning to turn golden brown at the edges.


Remove to a wire rack to cool. For clean cutting make sure cookies are completely cool and cut with a sharp knife. I actually didn't have to cut mine, they stayed separated pretty well.


AMAZING AMAZING AMAZING! Seriously. I told myself I would only eat one, because I have been doing very well at my healthy eating (minus this weekend), but I probably ended up eating 3 at least. Then, Sarah had this pure genius idea to make a big cookie. You know, like the one I am obsessed with at the Pizza Factory. Here is how she made it:

First, she made a graham cracker bottom (graham cracker crumbs w/ butter). She then made a crust at the bottom of a 9" round cake pan, greased.


She then took some of the remainder cookie dough that we made for the cookies and put it right over the graham cracker crust. She then topped the dough with some amazing hot fudge sauce and put it in the oven at 350 degrees for about 15 minutes. Now, you don't want to keep it in there too long. The whole point is to have a gooey amazing cookie doughish cookie!


Then, she couldn't just stop there! She had to then top it with more hot fudge sauce and then put a big scoop of vanilla ice cream right on the center.


This is a big statement, but I think I like this cookie more than the one at the Pizza Factory! I am telling you, it's the cinnamon! Sarah and I ate half of this pan alone. Yes, I said half. And that may be down playing the situation. Afterwards I felt so sick and was on a huge sugar rush! But it was worth every bite! Amazing is not even the word for it. Life changing for sure! Ahhh - I wish I had some RIGHT NOW!


My new love...

-alyssa*

homemade chicken pot pies*

I am currently right in the middle of making my new summer menus! I sent out menu idea sheets to each home on campus to get the students likes, dislikes and suggestions. So far I have gotten 3 sheets back and these homemade chicken pot pies were a favorite on all three!!

I am a HUGE fan of chicken pot pies, and one day decided to try this method out and it worked amazingly well! They are easy easy easy, and obviously very kid-friendly! I would highly suggest making these for your family! No more store bought, waiting 60 minutes to bake, frozen chicken pot pies :). These are so versatile, too! You can put whatever veggies you like, and really can use whatever kind of meat you like. A beef pot pie would be amazing, too! It would taste like beef stew. I love beef stew! Mmmm..I'm going to have to try that next!


Homemade Chicken Pot Pies
serves 6

1 lb. diced chicken, cooked
2 cans cream of chicken soup
3/4  cups chicken broth
1 cup peas and carrots, frozen
salt and pepper to taste
12 puffed pastry - 5x5 squares
egg wash

Preheat oven to 350 degrees. In a medium saucepan, combine the cooked diced chicken, cream of chicken soup, chicken broth, and peas and carrots. Heat through until the sauce and peas and carrots are warm. Season with salt and pepper.


On a greased baking sheet, lay down 6 squares of puffed pastry. Brush egg wash around the edges of the pastry. This will serve as a glue so that the top pastry layer sticks to the bottom layer. Scoop about 1/4 cup of filling in the middle of the pastry square. Top with another sheet of the puffed pastry and pinch the edges so that there are no openings. This is very important so that all of the gooey goodness doesn't ooze out! Then brush the top with more egg wash to help the puffed pastry get nice and golden brown.


Bake for 20-25 minutes, or until puffed pastry becomes a gorgeous golden brown.


We serve this with a side of roasted broccoli. SO yummy, and like I said there are so many different flavor possibilities. With a chicken pot pie alone you could add potatoes, broccoli, celery, carrots, green beans, onions...really the possibilities are endless! So be creative and remember to share your creations with me!

-alyssa*

strawberry filled cupcakes w/ laffy taffy frosting*

We made these cupcakes last week for all of the students. It may be selfish, but I actually chose to make these because I don't like strawberry flavored things. I like strawberries, but not most strawberry flavored things. They are just so sweet and..I don't now. There is just something about strawberry flavored things that rub me the wrong way. Anyway, I have been very successful eating healthy and I didn't want to fail so early on :). I did try a little tid-bit, and I wasn't a huge fan, but everyone else I talked to loved them! I think I didn't like it too much because it was strawberry flavored, of course, but also because of the buttercream. I am really beginning to think I am not a fan of buttercream. I am still not ready to make it official, however.


Strawberry Filled Cupcakes with Laffy Taffy Frosting
adapted from Real Mom Kitchen

1 box white cake mix
1 (10 oz jar) Smucker’s Simply Fruit Strawberry Spreadable Fruit
2 cups whipped topping
red food coloring
Sprinkles

Prepare cake mix according to the directions. Line muffin tin with cupcake liners and fill them 3/4 the way full. Bake according to the directions on the box.

In a medium bowl, combine the spreadable fruit and whipped topping. You will notice the coloring is not all that attractive, so add a couple of drops of red food coloring. Now that's better! This will be your filling for the cupcakes :).


When the cupcakes are nice and cool, hull out the middles. Put your fruit/whipped topping mixture in a pastry bag (I used a star tip) and squeeze in the filling.


Top with the laffy taffy frosting (recipe below).


Laffy Taffy Frosting
***This frosting is enough to cover all of the cupcakes but if you want it piled on on the cupcakes like I did in the photo then you will want to double this amount.***
  • 10 pieces of strawberry Laffy Taffy candy (the fun sized ones)
  • 2 Tbsp. heavy cream
  • 1 cup butter, room temperature
  • 2 cups powdered sugar

In a small sauce pan, melt the taffy and the heavy cream together stirring until the mixture is smooth. 

Remove from the heat and cool to room temperature.


While the mixture is cooling, begin preparing the frosting. In a mixing bowl, whip the butter until smooth. Mix in the powdered sugar, a half cup at a time, whipping until fluffy. 


Then add the melted and cooled laffy taffy a spoonful at a time.  You don’t want it too thick.  If needed, place it back on the stove for a few seconds to soften it just enough. After each spoonful of the laffy taffy, turn the mixer up to high and whip the frosting until it’s fluffy. You can also add a little pink or red food coloring to get the desired shade but I was happy with the color as it was.

Frost the cupcakes with the laffy taffy frosting and top with sprinkles. Makes 22-24 cupcakes.


And last, but not least, DIG IN!

-alyssa*

fusilli & shrimp salad*

I decided to take a break from posting something sweet. I am feeling vulnerable today and all I want is a big chocolate cupcake! Just the thought of having to describe the amazingness of a dessert right now could be lethal to my progress thus far :).

This shrimp salad is actually pretty good. Although, I am really not a fan of non-fried shrimp. I can eat it, but it wouldn't be my first choice. However, those that like shrimp really love this roasted shrimp! I really like the pasta with all of the roasted veggies. It is so fresh and perfect for summer!


Fusilli & Shrimp Salad
adapted from Meet Me in the Kitchen

First, get your water boiling for your fusilli. Prepare that according to the package directions. Then roast your vegetables- I used asparagus and red bell pepper this time. Set them aside while you prep the other parts of the salad.

Turn down the oven temperature and roast your shrimp. While the shrimp is roasting, cut your corn off the cob.

By this time the fusilli should be ready, drain the fusilli and put it in a large bowl. Add the roasted vegetables and corn kernels.

Then add about 1 Tbls olive oil, the lime juice, 1 Tbls red wine vinegar and chopped parsley. Season with salt and pepper. Add more olive oil, vinegar or lime juice, to taste.
Serve in bowls and top with roasted shrimp.

Roasted Veggies
1 pd of asparagus
1 red bell pepper
olive oil
salt & pepper

Preheat oven to 425 degrees F. Chop vegetables into 1-inch pieces and place on a rimmed baking sheet. Drizzle with olive oil and season with salt and pepper. Roast in oven for 12-15 minutes or until veggies are crisp- tender.

Roasted Shrimp
juice of 1 lime
olive oil
salt
pepper
1/4 cup chopped Italian parsley
1 pd peeled and deveined shrimp

Preheat the oven to 400 degrees F. Place the thawed shrimp on a large, rimmed baking sheet. Drizzle with olive oil, the lime juice, and season with salt & pepper. Sprinkle chopped parsley on top and toss everything together with your fingers.


Roast for 8-10 minutes, until shrimp is pink and firm.


To finish off the salad you need-
2 cobs of fresh corn, kernels cut off (I left this out, but it would be amazing!)
1-3 Tbls olive oil
juice of 1/2 or 1 lime
salt
pepper
1 -3 Tbls red wine vinegar
1/3 cup chopped Italian parsley


I don't know, because I have not tested it, but I would think that this salad would also be good served cold! If someone tries it, let me know how it turns out!

-alyssa*

german chocolate and funfetti cake pops*

I bet you are all dying to know if I am doing well on my new eating healthy way of life. Well, before I keep you in suspense any longer, I am excited to tell you that I am doing GREAT! And, to top it all off, I ran a mile today! I seriously felt like I was going to die, and when I was finished I was sure I was going to throw up, but I made it. I felt like one of the contestants on the Biggest Loser. Right when they get there some of them end up losing their lunch after their first couple of workouts because they are so out of shape. Well folks, that was me today. I actually decided to run a mile today because I am going to run the 5k at work on Monday. Well, I shouldn't say "run". Let's be honest, if I almost died after one mile, a 5k would probably really put me 6 feet under. So I will be walking/running, mainly walking :).

I made these cake pops I think the day that I decided that I need to lead a much healthier lifestyle. But I will be honest, I had a tiny bite of both so that I could report to all of you the verdict. We had a smoothies day for all of the staff, and naturally we just had to have a yummy treat to go along side! And ever since I made these for my sister's baby shower, I have been dying to test out some of my other options!

Now, german chocolate cake is probably my all-time favorite. My mom used to make me a home made german chocolate cake sometimes on my birthday. You can't beat that. So, obviously the german chocolate cake pops were to die for! Then adding on the hardened chocolate shell and some bits of pecans was just the cherry on top. I wanted to do some with some toasted coconut, but forgot until after we had already melted the chocolate. By then it was too late :(. The funfetti cake pops were also good and a favorite of nearly everyone in my department. However, the overall favorite of the rest of the staff was german chocolate :).


German Chocolate Cake Pops

1 box German Chocolate Cake Mix
1 container Coconut/Pecan Frosting
Chocolate melting chocolate
Pecan bits
Candy sticks

Cook cake mix as directed on the box. Let cool completely. In a medium bowl, crumble cake. Then add 1/2 of the container of coconut/pecan frosting.


Mix until well combined and the mix sticks together. Then form into balls, about the size of a golf ball.

Melt the melting chocolate as directed. Dip the very tip of the candy sticks in the melted chocolate, then place in the cake ball. Put cake balls in the fridge for 5 to 10 minutes, or until the melted chocolate has hardened. This helps the stick adhere to the ball so that it doesn't come out when you try to coat it in the melted chocolate.


Dip each cake pop in the melted chocolate until covered completely. Place on wax paper so that the stick is pointing upwards (or you can put the stick in some styrofoam if you want your cake pop to be like a lollipop). Sprinkle pecan bits immediately before the melted chocolate begins to harden.


Let sit until the chocolate has completely hardened. Enjoy!


Funfetti Cake Pops

1 Funfetti Cake Mix
1 container Funfetti Frosting
White Chocolate or Vanilla melting chocolate
Candy Sticks

Cook cake mix as directed on the box. Let cool completely. In a medium bowl, crumble cake. Then add 1/2 of the container of the funfetti frosting. Set the sprinkles aside to decorate the pops later. Mix until well combined and the mix sticks together. Then form into balls, about the size of a golf ball.


Melt the melting chocolate as directed. Dip the very tip of the candy sticks in the melted chocolate, then place in the cake ball. Put cake balls in the fridge for 5 to 10 minutes, or until the melted chocolate has hardened. This helps the stick adhere to the ball so that it doesn't come out when you try to coat it in the melted chocolate.


Dip each cake pop in the melted chocolate until covered completely. Place on wax paper so that the stick is pointing upwards (or you can put the stick in some styrofoam if you want your cake pop to be like a lollipop). Sprinkle on the funfetti sprinkles immediately before the melted chocolate begins to harden.


Let sit until the chocolate has completely hardened. Enjoy!


So so easy, and the options are endless!

-alyssa*

root beer float cupcakes*

When I had my little sister's baby shower, my mom brought me this recipe. I thought that it would be perfect for the students because most of them seem to love root beer! I also thought it would be the perfect way to kick off some better weather! Lately it has actually been quite nice. The past month or maybe even more I think it rained everyday but maybe 4 or 5. I could never live in a state where rain is frequent. After this last month I am 100% positive that I would have major depression issues, not to mention I would not be a very pleasant person to be around. I need my sun. It does miracles for my mood.

I went to a cooking class last night at the Blue Lemon in Highland. I have yet to eat there, but I have been to a couple cooking classes and they are so fun! Chef Todd (executive chef of Blue Lemon and also a culinary professor at UVU) teaches the class and he is so awesome! This class was on summer salads and he did an antipasto, 3 different types of bruschetta (my favorite), a shrimp louis, a roasted red pepper dressing and citrus vinaigrette, and a watermelon and jicama salad. All of which were pretty amazing! He is so funny and really gives you good tips when cooking. Then, the best part, he lets you taste all of his creations! Last night he actually plated up each one of his dishes for each person in the class. The classes I have been to previous we just went up and helped ourselves to the dishes, but last night he must have been extra rambunctious. It gave me some great ideas in different ways that we can present our food when we do the sports banquets and other events around campus. I wanted to take pictures of all of the amazing salads that he made, but I thought people would think I was psycho so decided against it. Maybe next week (which is dutch oven cooking - mmmm!).

Ok, back to root beer float cupcakes. Sorry, I get side tracked easily. These cupcakes were so easy to make! They really had a very distinct root beer flavor, which mainly came from the root beer buttercream frosting. The cupcake had a slight root beer flavor, but it would definitely have more if you added actual root beer extract, maybe even on top of the root beer. I'll be honest though, I don't know if I would make this cupcake again. I think I discovered that I am not the biggest fan of buttercream frosting. Or maybe just the last couple that I have tried from various recipes. I would much rather have a cream cheese or the flour based frosting that I use. But I haven't ventured off to all of my avenues, so I am not ready to make my buttercream dislikingness official.


Rootbeer Float Cupcakes

Ingredients

1 box white cake mix (I always use Duncan Hines)
1 cup of your favorite root beer
1 recipe buttercream (here's a link to the confession's of a cookbook queen's recipe)
1 teaspoon root beer extract

Preheat oven to 350. Line 24 muffin tins with paper liners.

Mix together root beer and cake mix (yes, just those two ingredients). Pour into paper liners and fill 3/4 full.

Bake for 15 to 18 minutes or until cake springs back when lightly touched. Remove from oven and allow to completely cool.


In a separate bowl, mix the buttercream frosting and root beer flavoring. Frost cooled cupcakes.


Then you can top them however your little heart desires. I picked a mini marshmallow and a drizzle of caramel. I just looked up what other people have done and one of the favorites seems to be a marachino cherry. There was even one person that made a well in the middle of the frosting and did a tiny scoop of vanilla ice cream! Now THAT would be a rootbeer float cupcake! I have said it once and I will say it again, I love people and the amazing things that they do! They never ceased to be absolutely and jealously amazed me!

-alyssa*