pumpkin roll*

Before we get started on the pumpkin roll, I have to tell you about the new love in my life. This, as well as the big chocolate chip cookie at the Pizza Factory, changed my life. What is it you ask?? A Nutella cream pie!! My mouth is watering as I think about this AMAZING chocolately, fluffy, creamy, crunchy perfect creation! You will see exactly what I am talking about tomorrow!! If I were you, I'd be counting down the hours!

Last week one of the students asked for a pumpkin cake with cream cheese frosting for their graduation. Now, I have a weird relationship with pumpkin. I HATE pumpkin pie. I try it every year praying that I will like it because it smells good, but yuck! I think it's the texture. I am definitely a texture person. Pumpkin pie does not do it for me in the slightest. But I LOVE pumpkin bread, cookies, cake, muffins, etc. I don't know why these things are only made around the holidays, but I think I am going to put an end to this. I WILL be making pumpkin cake in July at one of our BBQ's. I dare you to dare me :)

Anyway, so one of the students wanted a pumpkin cake. I made a pumpkin roll years and years ago and thought that this would be a great time to break another one out! If you have never made a cake roll, it looks a lot harder than it actually is. It takes a couple of steps, but really it's not hard at all. I made an ice cream roll once, and it was a little harder getting the ice cream the right consistency so that it's not too melty, but not too hard you can't spread it either. But a basic cake roll with frosting - piece of cake - literally!


Pumpkin Roll w/ Cream Cheese Frosting
adapted from Allrecipes.com

Directions
1/4 cup powdered sugar (to sprinkle on towel)
3/4 cup all-purpose flour
1/2 tsp. baking powder
1/2 tsp. baking soda
1/2 tsp. ground cinnamon
1/2 tsp. ground cloves
1/4 tsp. salt
3 large eggs
1 cup granulated sugar
2/3 cup Libby's 100% Pure Pumpkin
1 cup chopped walnuts (optional)
1 (8 oz) pkg cream cheese, softened
1 cup powdered sugar, sifted
6 Tbsp. butter, softened
1 tsp. vanilla extract
1/4 cup powdered sugar (optional)

Directions
Preheat oven to 375 degrees. Greese 15 x 10 inch jelly roll pan (or just a cookie sheet); line with wax paper. Grease and flour paper. Sprinkle a towel with powdered sugar.


Combine flour, baking powder, baking soda, cinnamon, cloves and salt in small bowl. Beat eggs and sugar in large mixer bowl until thick. Beat in pumpkin. Stir in flour mixture. Spread evenly into prepared pan. Sprinkle with nuts (if applicable).


Bake for 13 to 15 minutes or until top of cake springs back when touched. Immediately loosen and turn cake onto prepared towel. Carefully peel off paper. 

 
Roll up cake and towel together, starting with narrow end. Cool on wire rack.


Beat cream cheese, powdered sugar, butter and vanilla extract in small mixer bowl until smooth. 


Carefully unroll cake; remove towel. Spread cream cheese mixture over cake.


Reroll cake.


Wrap in plastic wrap and refrigerate at least one hour. 

 
Sprinkle with powdered sugar before serving, if desired. Cut into slices.


We dusted our slices with a powdered sugar and cinnamon mixed.


Throughout these last few months I have made a couple different pumpkin breads and cakes, and all of them have called for ground cloves and I've never had them. I just remembered to buy them right before this recipe, and I truly think that they make this cake what it is. They just give it a little kick. SO GOOD!!! So if you don't have them, it's fine and it will still taste good, but if you have them or can run to the store to buy them it will be that much better!!! Overall I loved this cake!! It was pretty and moist and the cream cheese frosting was delicious!

-alyssa*


santa fe foldover*

I am a subscriber to BettyCrocker.com and get e-mails frequently of different recipe ideas. Once in a while there will be a recipe that I cannot stop thinking about until I make it! This Santa Fe Foldover was one of those recipes! I have actually had it saved in my e-mail for a month or two, but haven't had the time to make it.

The reason it first caught my attention was because it was labeled "Cooking for Two". NEVER do you see something that is made for two people. This world just does not cater to such a thing. Or maybe just Utah? Weekly the husband and I are going grocery shopping and have a hard time buying a lot of things because 1. we don't want to waste half the meal or 2. there is no possible way we would use it before it expires unless we lived off of that one item for a week. So this whole "Cooking for Two" concept was really appealing!

After I got over the initial title, I looked at the picture. Can you say delicious?? And fancy looking! Plus, Mexican is one of our favorite things to eat so I knew that we would just love it! It looked like it might be on the difficult side, but it really wasn't! I had it all ready and put together and in the oven in no more than 15 minutes. Which was a great sign because that means that I may actually make it again! I am so busy that I really don't have the time or the energy for a meal that takes hours to make, especially once I get off work and have been cooking all day. This is good news for the husband! We may actually have one more thing to add to our 5 meal rotation :) haha!

Now, I modified this recipe just a tad. First off, it doesn't call for any meat. I am actually just fine with that, because I could be vegetarian - no lie. Meat is not my favorite thing. I like chicken...but I could live without just about anything else. However, for the sake of the husband I decided to add some lean ground beef seasoned with a little taco seasoning. However, once I added the ground beef to the recipe I think it would actually make 4 servings, so my cooking for two no longer applied. Oh well. Also, I didn't add the corn meal. I didn't have any on hand and didn't buy any because I knew I probably would never use it again and it would just chill in the cupboard til the end of time. I just added a little extra Bisquick and called it good. Worked beautifully! (p.s. again I apologize for the shadow-y pictures. Still haven't found a solution to my poor kitchen lighting :(..)


Santa Fe Foldover
adapted from Betty Crocker

Yield: 4 servings

Ingredients
1 cup Bisquick Heart Smart Mix
1/2 cup very hot water
1 lb. lean ground beef
2 tsp. taco seasoning
1 cup canned no-salt-added black beans, drained and rinsed
1/3 cup salsa
2 Tbsp. sliced green onions
1/4 cup shredded Colby-Monterey Jack cheese blend
1/2 cup shredded lettuce
1/3 cup chopped tomato
3 Tbsp. fat-free sour cream

Directions
1.  Move oven rack to the lowest position. Heat oven to 375°F. Spray a 12-inch pizza pan with cooking spray.
2.  Brown your lean ground beef and add taco seasoning. Set aside.
3.  In a small bowl, stir Bisquick mix and very hot water until soft dough forms. Place on surface sprinkled with Bisquick mix, gently rolling to coat. Shape into a ball; knead about 5 times or until smooth. Roll dough into a 10-inch circle; fold into fourths.


4.  Unfold on pizza pan. Spread ground beef over the dough to within 2 inches of edge. In a small bowl, stir together beans and salsa. Spread on top of ground beef.


5.  Sprinkle with green onions. Fold edge over. Sprinkle cheese over beans.


6.  Bake for 20-25 minutes, or until crust is golden brown and cheese is melted. Top with remaining ingredients.


7.  Cut into fours and DIG IN!!


I am so excited to make this again!! The husband even liked it and approved serving it a second time! That is not everyday folks!! We also topped it with some more salsa, Cholula, and some cilantro ranch. YUMMY!!

-alyssa*


hawaiian haystacks*

This meal was a request by one of the students a few months back. I had never made hawaiian haystacks before, and had only eaten it a handful of times but remembered I loved it! I looked up a few recipes for the sauce to mix the chicken in and there wasn't one that I either had all of the ingredients for or that I thought would be good so I came up with this really basic and simple recipe!


Hawaiian Haystacks
from Cundy's Culinary Creations

Yield:  4 servings

Ingredients
2 cups cooked white rice
4 chicken breasts, cooked and shredded
1 can cream of chicken soup
1 cup chicken broth
4 oz. cream cheese
1 tsp. salt
1 tsp. pepper
shredded cheese
green onions
pineapple tidbits
crispy chinese noodles

Directions
In a saucepan over medium-high heat add cream of chicken soup, chicken broth and cream cheese. Stir until sauce becomes smooth and bubbly. Season with salt and pepper. Add shredded chicken and heat through.

On a plate, put 1/2 cup cooked white rice, then top with chicken mixture. Top with cheese, green onions, pineapple tidbits, and crispy chinese noodles. You can also add green peppers, coconut, water chestnuts, tomatoes, slivered almonds...and the list goes on and on!


Enjoy!!

-alyssa*

orange chicken sauce*

My coordinator, Sarah, asked me the other day if I were to eat only one thing for the rest of my life what would it be? My answer: Panda Express. I am obsessed with their orange chicken. They even sell Panda Express Orange Sauce at the store, but I am telling you right now it is nothing like the real thing. I don't know what they do, but the real stuff is amazing!!


We have tried this orange sauce recipe a couple of times, and it's pretty good! It's still not quite as good as Panda Express, but it is the best alternative I have come across!! It's tangy and sweet with a kick from the crushed red peppers. I only have the recipe in a yield of 60 servings, but I am going to try my best to do it for only a yield for approx. 6 servings.


Panda's Orange Chicken
from unknown..
Yield:  6 servings

Ingredients

1 1/2 cups water
1/8 cup orange juice
1/2 cups brown sugar
1/3 cup vinegar
3 Tbsp. cup soy sauce
1/4 cup lemon juice
1/2 tsp. minced ginger
1/4 tsp. minced garlic
1 rounded teaspoon chopped green onions (I usually add more because that seems like nothing)
1/4 tsp. crushed red pepper
cornstarch

Directions

Put all ingredients in a stock pot. Bring to a boil. Whisk about a tablespoon of cornstarch with about 1/4 cup of the sauce in a separate bowl until cornstarch is well mixed without any lumps. Add cornstarch mixture into the sauce. Let boil for another minute and if it's still not the thickness you would like, add more cornstarch.


Once sauce has reached the right thickness, add immediately to your chicken, beef, pork or tofu.


Yummmmm..I love Chinese food!!!  I can't wait until biggest loser is over so that I can head straight to Panda! Counting the days.... :)

-alyssa*

apple/cherry bars*

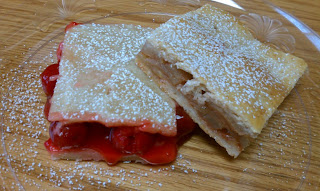
I LOVED when my mom would make these when I was growing up. They are just like pie, only they are a bar. And I am a HUGE fan of pie! Growing up my favorite was lemon meringue, but I think now my favorite is cherry. So as you can imagine, I love these cherry bars!

Let's talk about apple pie filling for a minute. The apple pie filling you can buy at the store is probably the worst thing invented. It always looks so good and appealing, and then I finally break down and eat a piece of "fake" apple pie and I have yet to not be disappointed. I guess I have just been spoiled, but my mom has always made her own apple pie filling. There really is no comparison. Literally my mouth is watering just thinking of her apple pie filling!  You MUST make this filling whether you are making these bars or a homemade apple pie! It is to die for!

We made these for dinner last night for all of the students. I couldn't decide what kind I wanted to do, so I figured we should just make both!! Which was probably a good idea because if we had made only apple I think our hands would have fallen off from peeling, coring, and slicing that many apples!

I thought they would take us hours to make, but really they didn't take nearly as long as I had anticipated. I also was worried about what I was getting myself into because I have only made a couple of homemade pies in my day, and I would not say I am an expert at making them whatsoever. Also, I have never even made this recipe!! I grew up eating them and watching my mom make them, but this was my first experience doing it myself. Maybe I should have made them on a little smaller scale, but hey - go big or go home!!

This dough recipe is really excellent! We added 3/4 cup of whole wheat flour, and 1 3/4 cups of all-purpose flour so that they were a little on the healthier side, but the dough was still a little sticky. DON'T get crazy and start adding too much flour!!! I just floured my board and then rolled the dough in the flour a little until it was the consistency of a pastry dough. But if you add too much flour it won't roll out very easily and it won't be very flaky. When I started rolling out my dough I still thought it might be a little too sticky, but it was perfect!! So again, don't start adding flour like crazy!


Apple/Cherry Bars
from Marla Sperry (my mom!!)

2 1/2 cups all-purpose flour (I did 1 3/4 cup all-purpose, 3/4 cup whole wheat)
2 Tbsp. sugar
1 tsp. salt
1 c. shortening (I used butter. Shortening freaks me out..)
1 egg
2/3 cup milk
1 can cherry pie filling (if making cherry bars)
apple pie filling (if making apple bars - recipe below)
egg wash

Directions

Preheat your oven to 375 degrees. Spray a cookie sheet with cooking spray. In a large bowl combine flour, sugar and salt. Cut in the shortening.


Do not worry if there are still little lumps, because those are actually what will make the crust nice and flaky. This is the part where you will get your hands dirty. I think using your hands is much easier and more effective than a wooden spoon. Add your egg and milk to the flour mixture and start mixing in with your hands. Only mix until the flour is mixed with the egg and milk, but DO NOT over mix! You may think that the dough is a little sticky, but that's ok. When you flour your board to roll out the dough you can mix a little more flour into your dough, but don't add too much. You still want it a slight sticky consistency.

Divide your dough in 1/2 and roll out on a floured board in the shape of your cookie sheet. Transfer your dough to the cookie sheet. Spread your cherry/apple pie filling over the dough, leaving about 1/2 inch around the edges.


Roll out the second half of your dough to the same size and place on top of your filling. Cut off the excess around the edges and pinch the top and bottom dough to make a seal. Brush on some egg wash and cut a few slits in the top of your crust.


Bake at 375 degrees for 35 minutes. If you would like, make a glaze for the top while still warm! YUMMY!


Now, the apple filling recipe! Oh man, this stuff is amazing!

Apple Pie/Bar Filling
from Marla Sperry (my mom!!)

6-8 tart apples (I used Granny Smith)
3/4 cup sugar
2 Tbsp. flour
1 Tbsp. cinnamon
a dash of nutmeg

Peel and core your apples, then slice the apples very thinly and put in a large bowl. Add your sugar, flour, cinnamon and nutmeg. Mix until the apples start releasing their juices. That's it!!!


I can eat these plain! They are that amazing! Add them as a filling for these bars just like the cherries, and they take the same baking time!


So what are you waiting for?? Go make some apple and cherry bars!!!

-alyssa*

dorito salad*

This recipe came from one of the students and it was a HUGE hit! I am sure this will be a menu item for years to come. Normally we would just do a taco salad with a tortilla shell bowl, but I think Doritos are the perfect substitution!


Dorito Salad
from a Heritage Student

Yield:  4-6 servings

1 lb. ground beef
1 pkg. taco seasoning
1 - 5 oz. package of lettuce (we used spring mix)
1 can kidney beans
1/2 cup diced red onion
1/2 cup sliced olives
1 cup cherry tomatoes
2 cups crushed Doritos
2 cups shredded cheese
cilantro ranch
salsa
sour cream

In a pan over medium-high heat put 2 tbsp. of oil, then add the ground beef. Cook until brown. Add taco seasoning and stir until evenly coated over ground beef.

In a large bowl add the lettuce, kidney beans, diced red onions, olives, cherry tomatoes and crushed Doritos. Toss until all ingredients are well distributed.


On your serving plate put 1 cup of  the Dorito salad mixture. Put 1/2 cup of taco meat on top of salad. Top with 1/4 cup shredded cheese, salsa, sour cream and finished with some delicious cilantro ranch. ENJOY!


How do you make cilantro ranch, you ask?? Well, I don't know the technical way, but I will tell you what I do. I make my buttermilk ranch dressing, but I put all of the ingredients in a blender and add one bundle (my grocer sells cilantro in "bundles" - at least that's what I'm calling them haha) of cilantro in the blender with the ranch and blend away! Keep blending until the cilantro is blended evenly into the ranch, and the ranch turns a lovely color of green! I know there are lots of recipes with green salsa, green chiles, limes, etc. etc., but I have been just keeping it simple. It's still very delicious, but I will be on the search for a good "cafe rio" type dressing in the future! If you have any cilantro ranch dressing that you use and love, please share it with me! THANKS!

-alyssa*

grilled chicken wrap*

Today Sarah and I were making a cheesecake for one of the students' birthday and I had such high hopes for it. I found the recipe online and the picture looked SO good, but the instructions were a little strange I thought. However, I am not an expert of cheesecake, seeing as how my first cheesecake was only a couple weeks ago. But this one said to cook it at 425 for 15 minutes, then 275 for an hour, then turn off the oven and leave the cheesecake in the oven for 2 HOURS. Maybe this is normal, I don't know. I checked on the cheesecake about 1/2 way through cooking it on 275 and it was turning pretty brown. So I turned it down hoping that the browning would stop (yeah right) but I didn't want the middle to be runny. Well-I turned the oven off with 10 minutes to go and still didn't dare open the oven doors because the instructions specifically said DO NOT OPEN OVEN during the 2 hour period. Finally an hour into it I couldn't take it anymore. I needed to see how dark the cheesecake really was, praying it wasn't burnt. Well, it wasn't burnt, but it wasn't the cutest thing ever. But I could save it by shaving off the top. The middle was moist and looked SO delicious, so I decorated it and you would never know it had any flaws. However, I will not be sharing the recipe with you because I will never be using it again, so I am going to save you the trouble. I will be sharing with you the end result though because it really turned out cute!


Cute huh!! As frustrating as it was, I am very happy with how it turned out!

Ok, let's talk grilled chicken wraps. These are hands down my favorite meal that we make as of right now. They are the cutest things ever and I love their presentation. They are kind of a process to make and I just make little stations of everything to put them together, but in the end they are worth the time. The recipe I have is for 25 servings, so just adjust it according to how many wraps you actually need.


Grilled Chicken Wrap
from Dixie Regional Medical Center

Ingredients

25 - 4 oz. chicken breasts
25 10" flour tortillas - I used tomato basil wraps
50 oz. lettuce - you can use romaine, or I used spring mix
25 oz. shredded parmesan cheese

Sundried Tomato Mixture

2 cups sundried tomatoes
1/2 cup minced garlic
1 cup capers

Mix sundried tomato mixture ingredients together and keep cool until ready to use.

Aioli

1 cup mayo - I used light
1/4 cup sundried tomatoes
1 oz. lemon juice
4 oz. artichoke hearts

Place all Aioli ingredients except mayo into a food processor and puree until a chunky consistency. Put mixture into a separate bowl and add mayo; mix until incorporated.

Directions for Wraps

Grill chicken then set aside. Heat a tortilla on an electric grill for 30 seconds per side (or you can throw one in the microwave for 10 seconds). Spread 1 ounce of Aioli onto tortilla. Slice chicken into 5 strips and place on top of lettuce. Add sundried tomato mixture on top of chicken. Top with cheese and 2 ounces of lettuce.


Then roll like a burrito and cut on a bias (45 degree angle).


These are SO YUMMY!! They would be perfect for a little appetizer at a party or for a light lunch. I like to serve them with my pesto pasta salad, and I normally serve this meal with a slice of lemon cheesecake. Now that is the perfect lunch!!

-alyssa*

nutella banana crepes*

We attempted to make these for breakfast this last Monday, not realizing that the kids were out of school and would be coming late to breakfast. Unfortunately there was no way the bananas would have lasted that long without going all brown and nasty, so we had to come up with a plan B. It was a sad day, but we will be serve them again and the kids will love it! They are obsessed with Nutella! I had never actually had it until a couple of weeks ago. I don't know why, but it has never appealed to me. Then one day I tried it with an animal cracker. I have truly been missing out on something that is amazing and it has been right under my nose for 3 years now. For those of you that have also never had the Nutella experience, this is the goodness in a jar!


Speaking of 3 years, I have been working at Heritage for exactly 3 years on Wednesday, January 26th (same day I get to go see the Jazz take on the Spurs! GO JAZZ!!). I was talking to the husband yesterday and told him that Heritage is probably the best thing that ever happened to me (next to him of course :). I cannot think of a better place to work or better people to work with. I LOVE my job!!!

Anyway, let's talk Nutella banana crepes. I attempted to make strawberry crepes a couple of months ago for the first time, and the crepes turned out ok but the cream cheese filling I had made wasn't my favorite. I'm still looking for a good recipe for a cream cheese filling, so if you have one please do share! This recipe for crepes I used today said to whisk the flour with the eggs, and then add the wet ingredients. DON'T DO THIS! I would add all of the wet ingredients, and then sift in the flour. I did it according to the directions and it resulted in a lumpy batter. No matter how fast I whisked, the lumps would not come out. It still tasted good, but you will have a much smoother batter this way.

Nutella Banana Crepes
crepes by allrecipes.com

Yield:  8 crepes

Ingredients

1 cup all-purpose flour
2 eggs
1/2 cup milk
1/2 cup water
1/4 tsp. salt
2 tbsp. butter, melted
8 tbsp. Nutella
2 large bananas, sliced

Directions

In a large mixing bowl, whisk together the flour and eggs (please see my tip above). Gradually add in the milk and water, stirring to combine. Add the salt and butter; beat until smooth.

Heat a lightly oiled griddle or frying pan over medium high heat. Pour or scoop the batter onto the griddle, using approximately 1/4 cup for each crepe. Tilt the pan with a circular motion so that the batter coats the surface evenly.


Cook the crepe for about 2 minutes, until the bottom is light brown. Loosen with a spatula, turn and cook the other side.


Let crepe cool for about 5 minutes, just so the Nutella can spread easily. Take 1 tbsp. of Nutella and spread it right now the center of the crepe. Take some of the banana slices and place them on top of the Nutella.


Then roll it up like a taco. Dust the crepe with powdered sugar. You can also top it with some whipped cream or a drizzle of chocolate syrup! Mmmmm..


If you are a crepe lover (like me), a chocolate lover (like me), and a banana lover (like me) you will LOVE these! And they literally took me about 10 minutes. I had one for dessert tonight. Shouldn't have because I'm doing the biggest loser, but I have ate good all week and I needed just one little treat. I figure it was probably better than a big piece of chocolate cake!

-alyssa*

waffles*

I grew up eating these waffles my whole life. I would have to say that they are one of my favorite breakfasts! Although I'll admit, I'm weird. I don't really like syrup, and I like my waffles really really crispy. I let it cook until they are dark brown. I mostly only eat them with a little bit of butter, or once in a while I will top them with some strawberries and whipped cream. But these really are delicious!!


Waffles
from Marla Sperry (my mom!!)

2 c. flour
2 tsp. baking powder
1 tsp. salt
3 Tbsp. sugar
1 2/3 c. milk
6 Tbsp. vegetable oil
2 eggs - put yolk in batter

Mix all ingredients except the egg white.Whip egg white in a separate bowl until peaks are formed.


Fold into batter.


Keep folding softly until the the egg white is completely incorporated.


Cook in waffle iron for about 3-4 minutes


or until golden brown (or if you are like me, for about 8-9 minutes, or until dark brown :) )


And walah! You have some beautifully fluffy and tasty waffles! Top them however you like. You can even add your blueberries, strawberries, etc. right into your batter. Mmmm..that sounds good! This recipe makes about 12 3x3" waffles, but if you want to use a belgian waffle maker I am not sure how many it will make. I actually half the recipe for the hubby and I, and we still have leftovers. But don't fret! Put your leftover waffles in a ziploc and put them in the frewzer, then in the morning and throw them in the toaster and you will have an Eggo waffle, only better!!


More reason to make much more than you actually need! ENJOY!!

P.S. I must apologize for some of these pictures. The lighting in my house is not the greatest and I have yet to find a place where I won't have a million shadows. I'll keep working on it!

-alyssa*

cookies 'n cream ice cream cake*

Ice cream cakes have been a favorite of the students for their birthdays and graduations, especially lately. I've been getting bored of the plain stacked cakes with ice cream in the middle, so I was looking for something different. I found this amazing looking cake from Delicious Recipes, but I didn't have any Swiss Rolls on hand and didn't have time to run to the store. So I made my own version. Here it goes!


Cookies 'n Cream Ice Cream Cake
inspired by Delicious Recipes

6 cups Oreo crumbs
1 lb. butter, melted
20 oz. hot fudge
1 chocolate sheet cake (any chocolate cake mix will work, or your favorite chocolate cake recipe)
1 - 1.5 qt. vanilla ice cream, softened
1 - 1.5 qt. cookies 'n cream ice cream, softened

Line a 2 quart mixing bowl with plastic wrap (so the cake won't stick and will easily come out). In a separate bowl combine the Oreo crumbs and melted butter until evenly mixed. Then press the mixture into the 2 quart mixing bowl until it reaches the top. Warm the hot fudge in the microwave for about 45 seconds or until it will pour easily. Spread the hot fudge over the cookie crumb crust until the covers it completely. Put in the freezer for 1/2 hour.


Now this is where you get creative. I started to cut my sheet cake into squares so that I could press it into the hot fudge. Then I had to cut a few triangles to fill in the gaps. The picture might explain this part better:


It doesn't look the cutest, but I promise in the end you won't even be able to tell. Again, put it in the freezer for another 1/2 hr.

Spread the softened vanilla ice cream over the cake layer evenly. And again, put it in the freezer for 1/2 hour.


Finally, put in the cookies 'n cream ice cream and fill in the rest the hole.

 
Freeze it again for at least an hour and then it's time to flip! Put a tray/plate on top of the ice cream cake and then flip and it should easily come out.


Looks like a volcano huh! Everyone wanted me to make a hole and put dry ice in it to get the full effect. Maybe some raspberry topping oozing out...I think it would make a great science project! Anyway, now cut into this beauty and see what's inside!


So cute!!! However, I don't know how I feel about the Oreo cookie crust. It started to crack and it was pretty tough to cut into. Someone had suggested I mix the Oreos with some cream cheese instead of butter and make it more of a spread. That might work out better. Although the crust was very yummy, it sure didn't want to stay on very much. But I was impressed overall! Next time I will be making the swiss cake roll ice cream cake, so get prepared :)

-alyssa*